Showing posts with label windows. Show all posts

Thursday, May 28, 2026

Complete Tailscale Guide; Setup, Deployment, and Hardening

The Complete Tailscale Guide:
Setup, Deployment, and Hardening

If you've ever wrestled with port forwarding, dynamic DNS, or a clunky traditional VPN just to reach a device at home or a server at work, Tailscale is about to change your life. It creates a private mesh network (called a tailnetacross all your devices, wherever they are, with no open ports and no complex firewall rules. It just works.

This guide covers everything: creating and securing your account, installing Tailscale on Windows, Linux, virtual machines, and Docker containers, and hardening your tailnet so it's both maximally secure and actually pleasant to use.

Tuesday, February 3, 2026

The Manual Every Computer User Should Read


We’ve all been there... 

The screen freezes. 

The printer won’t connect. 

A suspicious email pops up in your inbox, and you aren't sure if you should click it. 
For most people, computers are essential tools, but they are also sources of endless frustration and anxiety.

After 20+ years of professional experience in IT, I realized that while technology changes, the fundamental skills users need to stay safe and efficient rarely do. I wanted to create a comprehensive, practical guide that bridges the gap between "technical jargon" and "what do I actually click?"


The Computer Handbook

*Updated 2-16-2026 to fix hyperlink issues!

Wednesday, January 21, 2026

QuickBooks Error 3371 Cause, Fix & Prevention


How to Fix QuickBooks Error 3371:
When Repairs Don’t Work

QuickBooks Error 3371, “Could not initialize license properties” is one of the most frustrating QuickBooks errors because standard fixes often fail. Repair installs, reinstall tools, and even Intuit’s own troubleshooters may do nothing.

This article documents a real-world failure mode we see in IT support and some fixes that actually work.

Friday, January 16, 2026

Switch Windows Server Editions Using DISM; Windows Server Activation


Switch Windows Server Editions via DISM

Sometimes you need to change your Windows Server edition; maybe you installed Datacenter but only have a Standard license, or you're migrating licensing models. Here's how to do it in-place without a full reinstall.

Installing Remote Desktop Services on Windows Server 2025 (Workgroup; No Domain)


Installing Supported Remote Desktop Services, on a Workgroup Server (No Domain)

Microsoft’s official stance is that Remote Desktop Services (RDS) generally requires an Active Directory Domain. However, for small environments, standalone servers, or specific test cases, you can set up a Workgroup RDS Deployment.

This guide covers how to install the RDS roles manually, configure licensing without a domain controller, and strictly manage local user access.

⚠ Important Warning: This guide focuses on a Workgroup setup. If you require strict Per-User CAL enforcement or advanced features like RD Gateway, a Domain environment is the only fully supported path.

Monday, June 23, 2025

Automated System-Wide Debloating & Basic Software Installation for Windows 10/11

Introducing "DeployWorkstation"

A System-Wide/All-Users Debloating & Basic Application Installation
PowerShell Script For Windows 10 & Windows 11 Systems

Monday, May 19, 2025

Windows Network Suddenly Stops Working – Troubleshoot File/Printer Access (Easy Guide)

Windows Network Access Stops:
Troubleshoot for File/Printer Sharing
*Easy Guide for Windows 10/11


If your computer could access shared folders or printers yesterday—but suddenly can’t today—don’t worry! These steps will help you check and fix the most common things that might have gone wrong.


Windows Network Suddenly Stops Working – Troubleshoot File/Printer Access (Technical Guide)

 
Windows Network Access Stops:
Troubleshoot for File/Printer Sharing
*Advanced Guide for Windows 10/11

If a previously working Windows network suddenly stops functioning—e.g., users can no longer access server shares, mapped drives, or network printers—this guide outlines what to check to restore connectivity.


*For an easier troubleshooting tutorial, please visit/use our "Easy Guide"


Friday, May 2, 2025

Fix Local Windows Network Discovery & Network Device/System Access Issues


Fix Windows Network Discovery & Network Device/System Access Issues


1. Ensure Network Discovery is Enabled.

Follow these steps to ensure that network discovery is enabled:
  1. Open the Control Panel.
  2. Navigate to "Network and Sharing Center".
  3. Click on "Change advanced sharing settings".
  4. Ensure that "Turn on network discovery" and "Turn on file and printer sharing" are selected.

Monday, February 17, 2025

Convert Existing Windows Installation from MBR/CSM to GPT/UEFI!

Convert an existing Windows 10 Installation from Legacy BIOS to UEFI

One of the critical system requirements for Windows 11 is having a GPT partition scheme for installation, which must be based on UEFI. This article explains how to convert existing Windows 10 Installation from the Legacy MBR partition scheme to the more modern GPT UEFI partition scheme, using Microsoft's MBR2GPT.exe tool; all without losing any data or settings!

Friday, August 9, 2024

Set your Windows PC Network Profile to Private and Make Sure File and Print Sharing is On

Ensure Your Windows PC's Network is Set to Private and File & Printer Sharing Settings Are Correct!

1. Check and Set Your Network Profile to Private

  • Open Settings:

    • Press Windows + I to open the Settings app.
  • Go to Network & Internet:
    • In the left-hand menu, click on "Network & Internet."
  • Choose Your Network:
    • Click on "Properties" next to your current network connection (e.g., Wi-Fi or Ethernet).
  • Set Network Profile to Private:
    • Under "Network profile type," select "Private."
    • This setting makes your PC discoverable on the network, which is necessary for File and Printer Sharing.

Wednesday, March 27, 2024

Upgrade To Windows 11 ~ With Your Apps and Data Intact!

 Can You Install Windows 11,
Without Losing Apps or Data In The Process? 

Why yes you can! 

Thanks to the Windows Installation Assistant!


I found an article (linked below) while looking into a "surefire" way to upgrade a Windows 10 system to Windows 11, without having to run the risk of needing to reinstall software and applications, or even potentially loose data. Currently, the only guaranteed method to install Windows 11 on your computer without performing a fresh install is by using the Installation Assistant. This tool from Microsoft acts as an update, transforming your existing Windows installation to the newer version without affecting any of the files or applications:

 https://helpdeskgeek.com/windows-11/how-to-upgrade-to-windows-11-without-losing-any-data/


Tuesday, March 5, 2024

Scan/Repair Corrupted Windows 10 & Windows 11 System Files

1) Open an elevated Command Prompt:

2) In the command prompt, enter the following commands one at a time. Let each procedure fully complete its process before moving on to the next command/repair.

  1. SFC /SCANNOW
  2. DISM /Online /Cleanup-Image /StartComponentCleanup
  3. DISM /Online /Cleanup-Image /RestoreHealth

3) Restart the system and verify repairs were completed successfully.

4) If issues persist after running these repairs, running a repair installation of the Windows Operating System (being sure to retain user data) would be the next step in hopes of repairing the system:

https://support.microsoft.com/en-us/windows/reinstall-windows-d8369486-3e33-7d9c-dccc-859e2b022fc7#bkmk_reset_windows_10

Wednesday, April 19, 2023

How to Create a Local Account When Setting up a NEW Windows 11 Computer

How to Create a Local Account When Setting up a NEW Windows 11 Computer


We figured out a way to create a local account on Windows 11 when you are installing a fresh OS or setting up a new system! With this trick, you can steer clear of the Microsoft account requirement for Windows 11!

The easiest way to set up Windows without a Microsoft account is using a "dummy account" that was set up for this exact purpose. You don’t need to open Command Prompt, run commands, or disable the internet connection here. It’s a tried-and-tested method, and it just works without any fuss.

The easiest way to set up Windows without a Microsoft account is using a "dummy account" that was set up for this exact purpose. You don’t need to open Command Prompt, run commands, or disable the internet connection here. It’s a tried-and-tested method, and it just works without any fuss.

Here’s how to go about it:

  1. First, connect to the Wi-Fi and proceed with the Windows setup as normal. If you have a wired Ethernet connection, keep it connected.
  2. When you reach the Microsoft sign-in screen, enter a@a.com under the email field and click on “Next”. Do not worry, it’s a locked dummy account used for bypassing the Microsoft account requirement.
  3. On the next page, enter any password you like just to complete the steps. 
  4. Now, click on “Sign in“.
  5. Since it’s a locked account, Microsoft will straight away start setting up a local account for you. You will see an “Oops, something went wrong” error, and then you can create a local account on Windows 11. Simply click on “Next”.
  6. Now you can now use Windows 11 without logging into a Microsoft account!

*UPDATE* 4-24-2024

The method listed above has been proving more and more ineffective in bypassing the mandatory requirement to set up a new Windows 11 computer, with a Microsoft account. But there's a simple trick for setting up a local account that involves issuing a command to keep Windows from requiring the Internet to install/set up and then cutting off the Internet at just the right time in the setup process. This works the same way whether you are doing a clean install of Windows 11 or following the OOBE process on a store-bought computer.


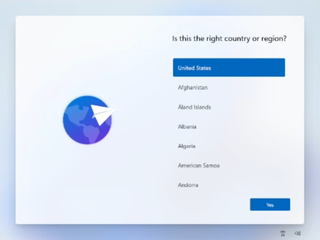
1. Follow the Windows 11 install process/setup process until you get to the "choose a country" screen:


(Image credit: Tom's Hardware)

*Now's the time to cut off the Internet. However, before you do, you need to issue a command that prevents Windows 11 from forcing you to have an Internet connection.


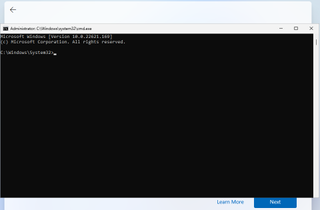
2. Hit Shift + F10. A command prompt appears.
(Image credit: Future)

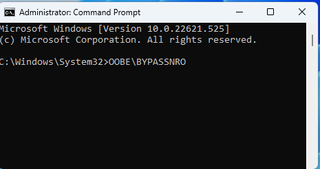
3. Type OOBE\BYPASSNRO to disable the Internet connection requirement.

*The computer will reboot and return you to this screen.


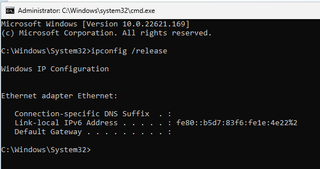
4. Hit Shift + F10 again and this time Type ipconfig /release. Then hit Enter to disable the Internet. Alternatively you could also simply unplug the network cable if that's at all possible.

(Image credit: Tom's Hardware)

5. Close the command prompt.

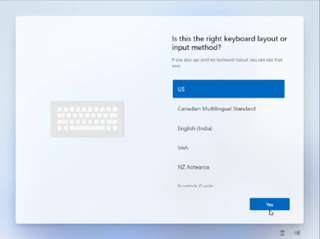
6. Continue with the installation, choosing the region. keyboard and second keyboard option.

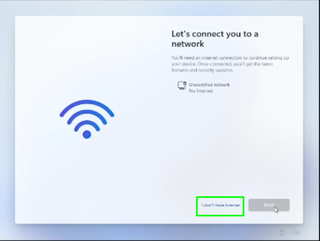
*A screen saying "Let's connect you to a network" appears, warning you that you need the Internet.


7. Click "I don't have Internet" to continue.
(Image credit: Tom's Hardware)

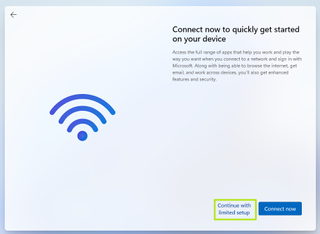
8. Click Continue with limited setup.

(Image credit: Tom's Hardware)

A new login screen appears asking "Who's going to use this device?"


9. Enter a username you want to use for your local account and click Next.

You are now setting up a local user account to be used, instead of being associated with a Microsoft Account!

Friday, March 3, 2023

Windows 11 Local Security Authority Protection Is Off & Won't Turn Back On!?


If you have a Windows 11 computer and find that your Local Security Authority protection is turned off, and Windows won't turn it back on, no matter how many times you restart the system. There is a simple registry edit you can make to get things working again!

Hold down the Windows key on your keyboard + R at the same time, this brings up the Run dialog box. Type regedit and hit enter to bring up the registry editor. 

Inside the registry editor, in the list on the left side, navigate to:
HKEY_LOCAL_MACHINE\SYSTEM\CurrentControlSet\Control\Lsa

Once there, right-click anywhere on the list on the right side to bring up the context menu. Select New>DWORD (32-bit). Make sure you don't click QWORD (64-bit) by accident. If you're seeing a list that says "Modify" and some other options, left-click anywhere on the white space in the list to deselect whatever is selected there and right-click again.

Now name the new entry "RunAsPPLBoot", then right-click the "RunAsPPLBoot" entry and click Modify. The "Value" box should already be highlighted, enter 2 and click OK. Close the registry editor without modifying anything else, and restart your computer.

Wednesday, January 4, 2023

Find Your Microsoft BitLocker Recovery Key


So your Windows Computer just recently completed some Windows Updates, or maybe you changed some system settings. But NOW all of a sudden, your Windows computer is asking for a "BitLocker Recovery key" to be able to start your computer!
But you have no idea what BitLocker is, what BitLocker does, nor do you know what to do!

"BitLocker Drive Encryption is a data protection feature that integrates with the Windows operating system and addresses the threats of data theft or exposure from lost, stolen, or inappropriately decommissioned computers."
Which is all fine and dandy if you purposefully set it up, and saved the recovery key information. The BitLocker disk encryption keeps your data safe in the event your computer is lost or stolen. But, more often than not, folks don't even realize that BitLocker is even turned on, and thusly do NOT have any recovery methods ready to go if they were to get locked out!

If your system is asking you for your BitLocker recovery key, the following information may help you locate your recovery key. 

There are several places where your recovery key may be, depending on the choice that was made when activating BitLocker.  If you purposefully turned on BitLocker hard drive encryption, you may have printed out the security key that was created.   Or you may have saved that BitLocker Recovery key information to a USB thumb drive and thusly created a "Recovery USB Key". If so, just use the appropriate recovery method that you have created/saved, to get back into your system!

If you don't have any kind of Recovery Key information backed up or saved, the easiest way to find your BitLocker recovery key is through the Microsoft account you were using on that computer! Your Microsoft account is typically tied to your everyday email address, plus a password that was set up.

So all you need to do is use another computer or a tablet, or even your cell phone, and sign in to your Microsoft account to find your recovery key. This is the most likely place to find your recovery key! 


If you are NOT able to find any sort of recovery key, you would be looking at having to reinstall the Windows Operating System to get the system functional again. But, since the hard drive is encrypted, data backup nor data recovery would be possible.

If we can be of any assistance with this type of problem or issue, please don't hesitate to reach out!


Thursday, September 1, 2022

Fix the "Virus Scan Failed" download error in Google Chrome, and the "Couldn't Download Virus Scan Failed" error in Microsoft Edge

Fix the "Virus Scan Failed" download error in Google Chrome, and the "Couldn't Download Virus Scan Failed" error in Microsoft Edge

  1. Locate the following registry subkeys:
    \HKEY_LOCAL_MACHINE\SOFTWARE\Microsoft\Windows\CurrentVersion\Policies\Attachments
  2. If you do not see the "Attachments" subkey, create it by right-clicking on "Policies", selecting "New", then clicking "Key", and then typing "Attachments" as the key name.
  3. Right-click "Attachments", select "New", and then click "DWORD (32-bit) Value".
  4. Type "ScanWithAntiVirus" as the value name, and then press Enter.
  5. Right-click the new "ScanWithAntiVirus" DWORD value, and then click "Modify".
  6. In the "Value data" box, type 1, and then click OK.
  7. Exit the Registry Editor.
  8. Restart your computer, and then log back into Windows to have the registry change take effect!
The download error(s) should be now resolved in both Google Chrome and Microsft Edge!
Jon Pienkowski
Pacific Northwest Computers
www.pnwcomputers.com
www.linktr.ee/pnwcomputers
360-624-7379

Monday, May 30, 2022

Windows Security Center Stops Working - Windows 11

I have run into a problem repeatedly recently. On a client computer running Windows 11, if I go to open the Windows Security Center, it won't open and I will get the following message/error:

Some websites will recommend the following:

"Go to the Settings. Select App > Apps & features and type in ‘security’ in search menu box. An icon for Windows Security will pop open. From there, click on the options (three dots) and select Advanced options. Now scroll down to Reset section and click on Reset.

You’ll get a confirmation asking if you really want to reset the app, along with your whole app data. Click on Reset to go with it."

However, so far what I have found is that "Windows Security" is not in the application list at all! 

So how can I reset the app?

Well, what I have found was a simple command you can run from the Windows PowerShell (with administrative privileges) that ultimately solved the problem for me, as well as for some of my clients who have run into this same issue as well.

  • Using Windows' search, just type in "PowerShell"


  • Right-click on its icon, and select "Run as Administrator"
  • Next, copy and paste (or type in) the following script:

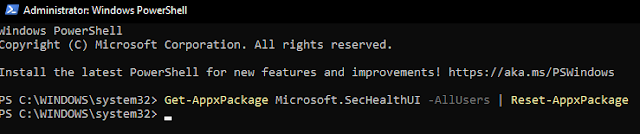
Get-AppxPackage Microsoft.SecHealthUI -AllUsers | Reset-AppxPackage

  • Hit Enter, and you should get a screen like this:


That should do the trick!
Your Windows Security Center should now be working again!

Pacific NW Computers
www.pnwcomputers.com
360.624.7379

Thursday, April 28, 2022

M.2 SSD Not Detected by Windows 11/10 Installer

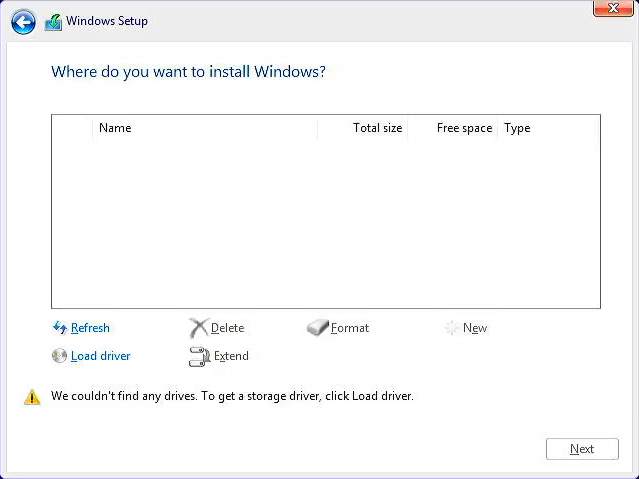
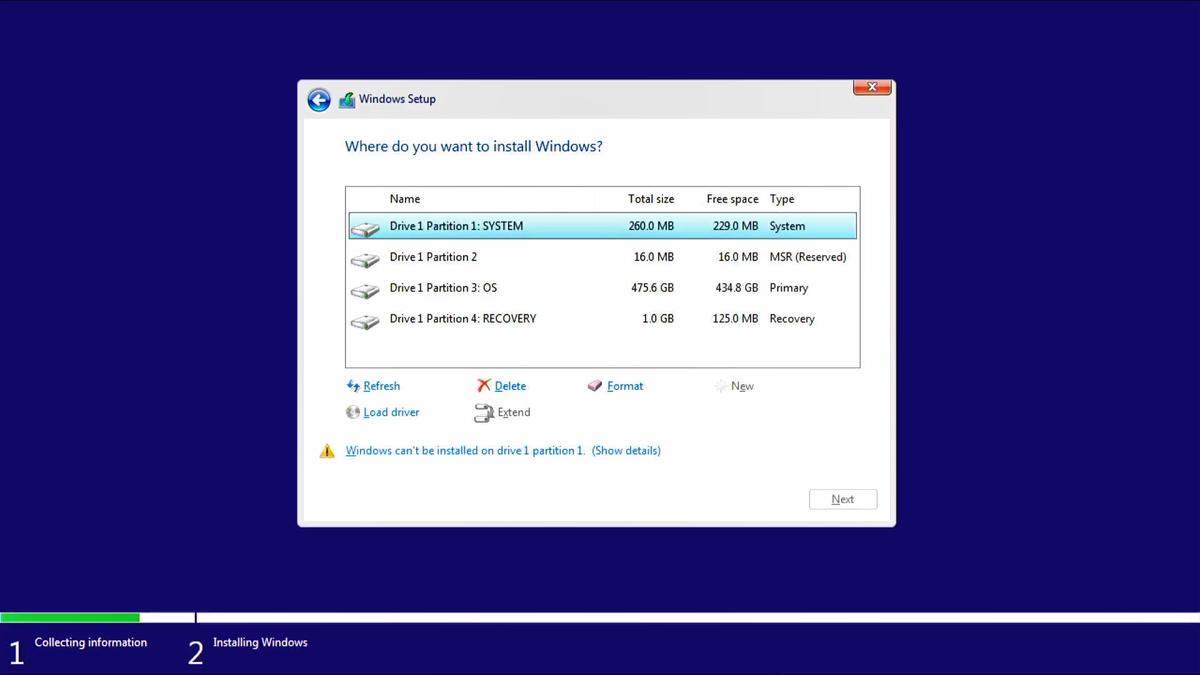
If you experience that the Windows installer cannot find your M.2/NVMe drives when installing Windows 11/10, try this process of loading the Intel IRST driver to gain access to your SSD drive!


For the Intel CPU platform, you need to manually install Intel Rapid Storage Technology (IRST) driver during the Windows installation process. You can also refer to the Intel document of How to Configure RAID or Intel Optane Memory with Intel RST on an Intel VMD Capable Platform.
Note: The following pictures are a reference, it may be varied depending on the different versions.


Manually install Intel Rapid Storage Technology (IRST) driver

  • Download Intel Rapid Storage Technology (IRST) driver Download Link.
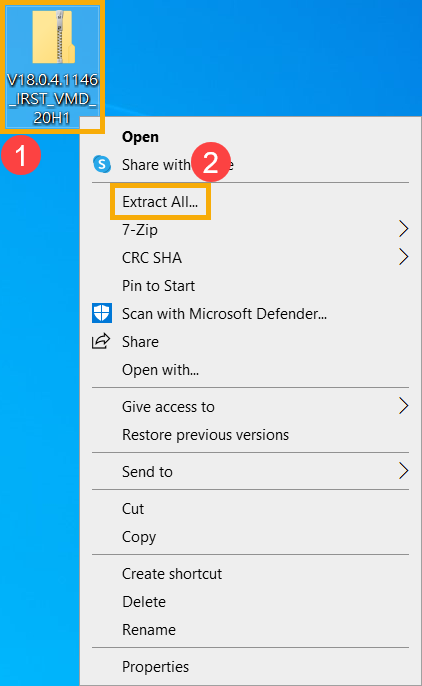
  • After downloading the driver, right-click [V18.0.4.1146_IRST_VMD_20H1] compressed file① and select [Extract All]②.
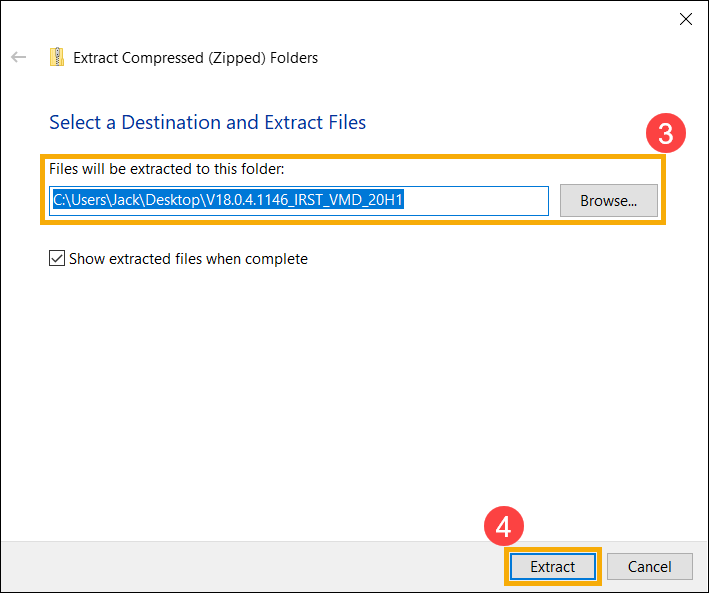
  • Select a Destination③ (such as a USB thumb drive) and click [Extract]④.

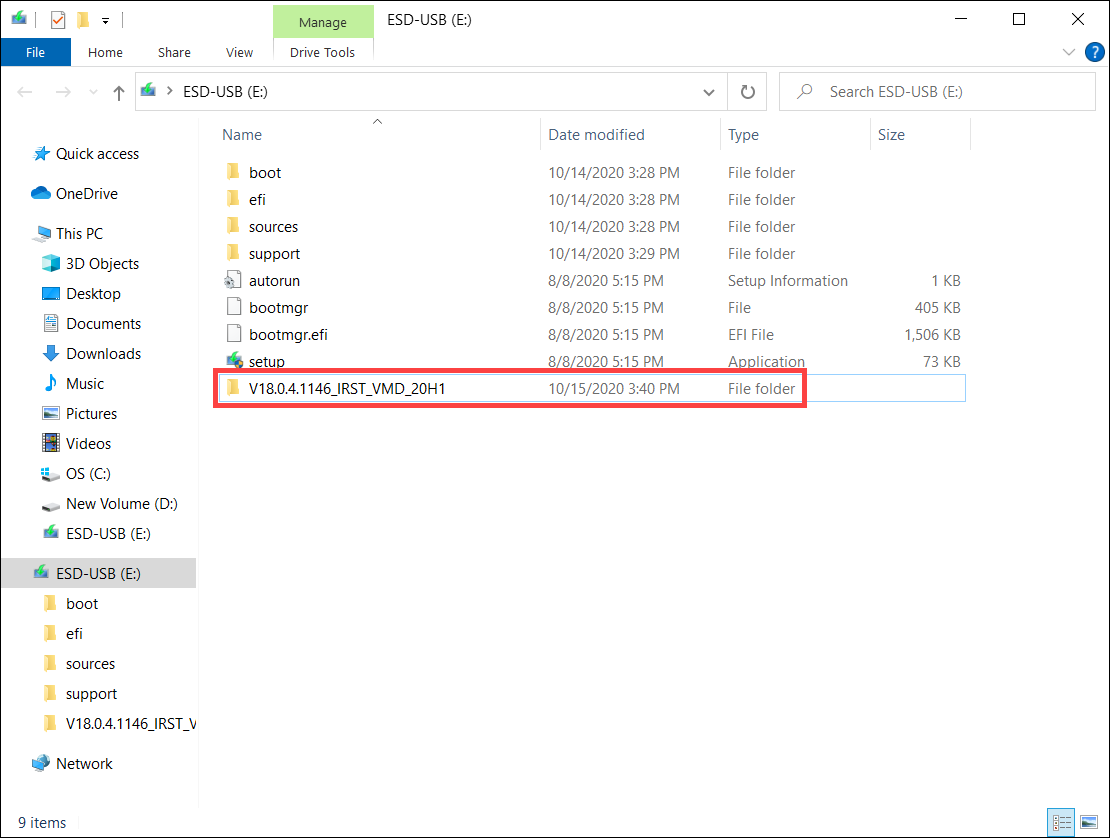
  • After the extraction is completed, please copy the entire folder (V18.0.4.1146_IRST_VMD_20H1) to a USB flash drive.
  • If you used a USB flash drive to create the Windows 11/10 installation media as well, please copy the entire folder to the same USB flash drive which is created as the Windows 11/10 installation media.

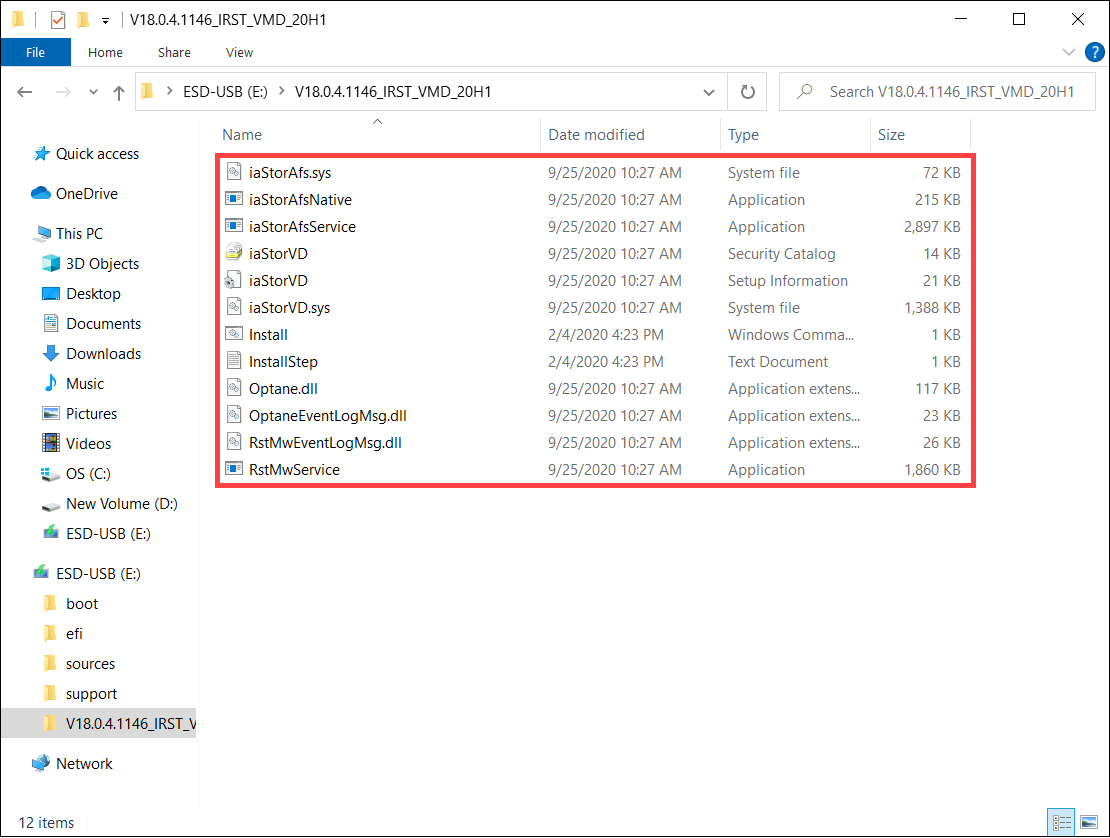
  • After the copying is completed, make sure the folder includes the following files.

Install Intel Rapid Storage Technology (IRST) driver

  • Connect the USB flash drive which includes the Windows 11/10 installation media and Intel Rapid Storage Technology (IRST) driver (V18.0.4.1146_IRST_VMD_20H1 folder) to the target computer. (If you used a DVD to install Windows 11/10, please insert the DVD and consist of the above files USB flash drive to the target computer together.)
  • Restart the Windows 11/10 installation process, here you can learn more about How to use installation media to insatll Windows 11/10.
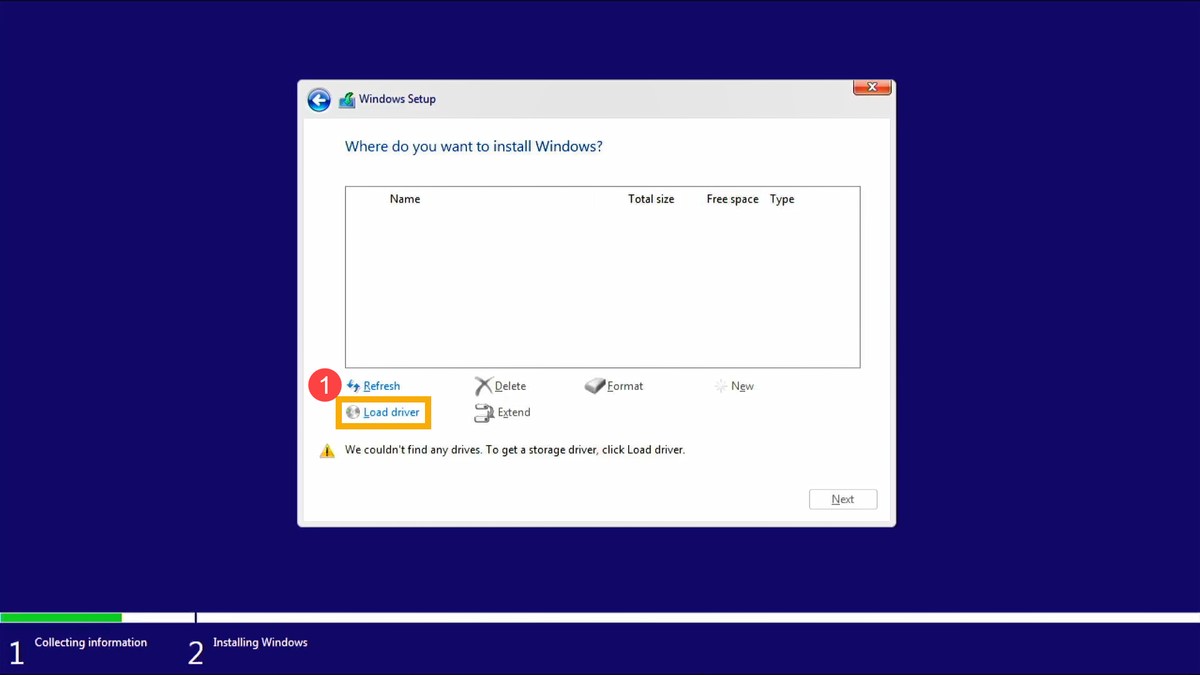
  • On the screen of Where do you want to install Windows and Windows cannot find any drives, please select [Load driver]①.

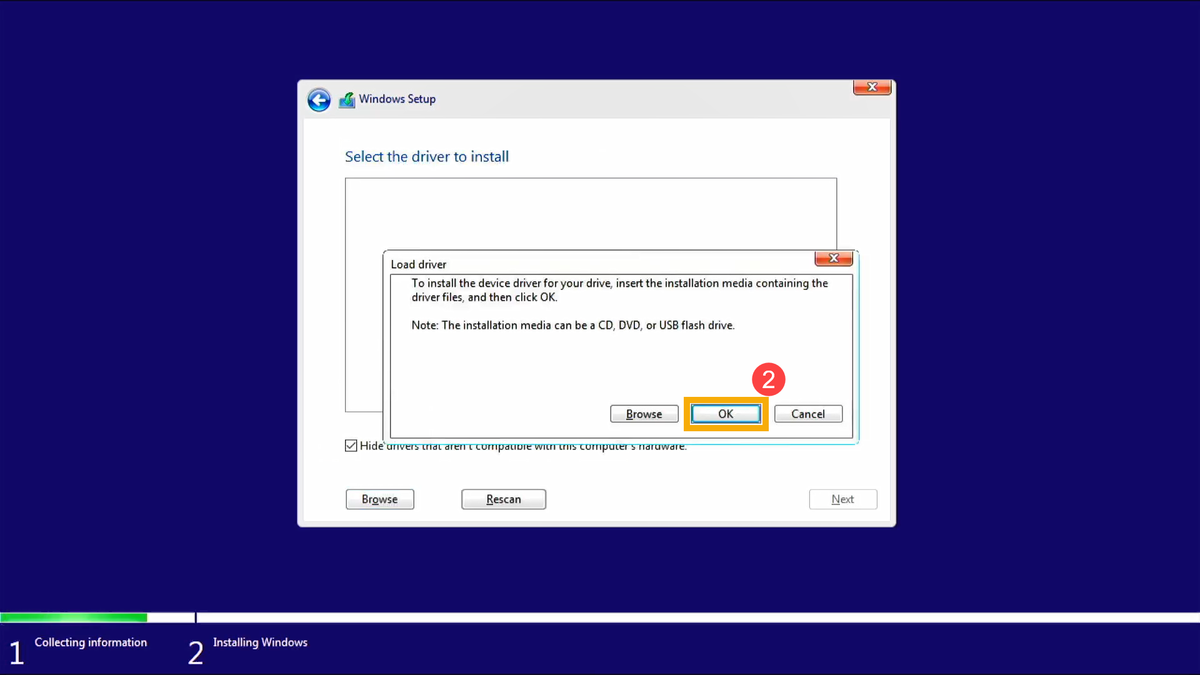
  • Select [OK]②.

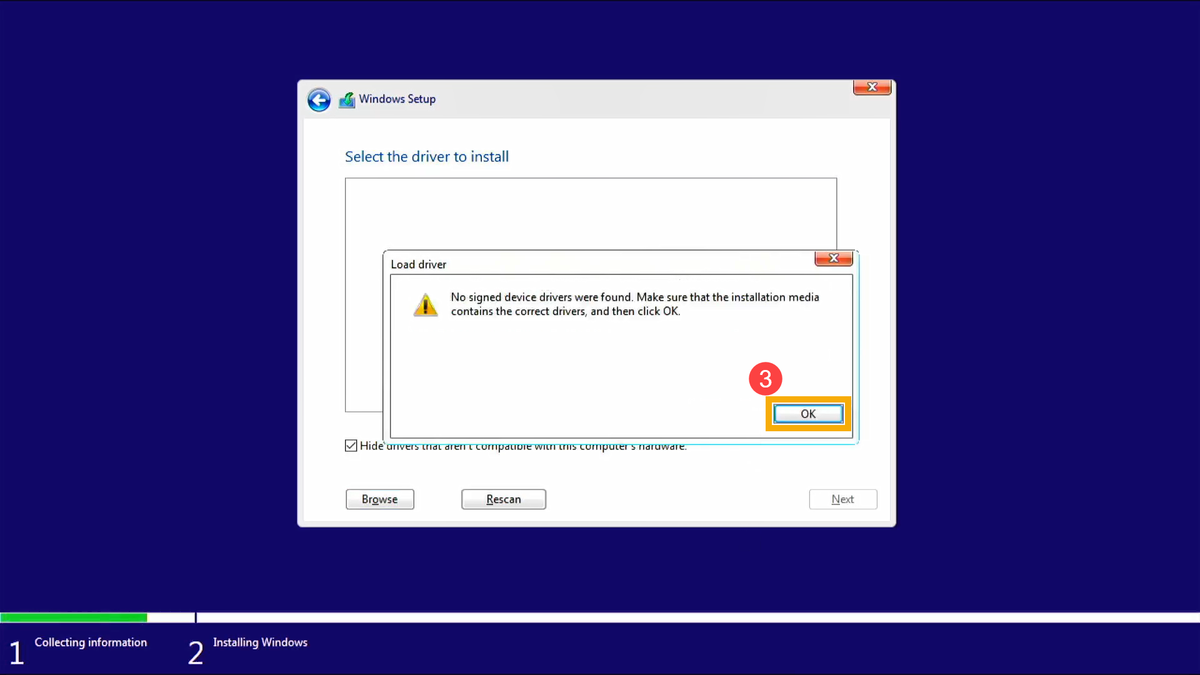
  • Click [OK]③.

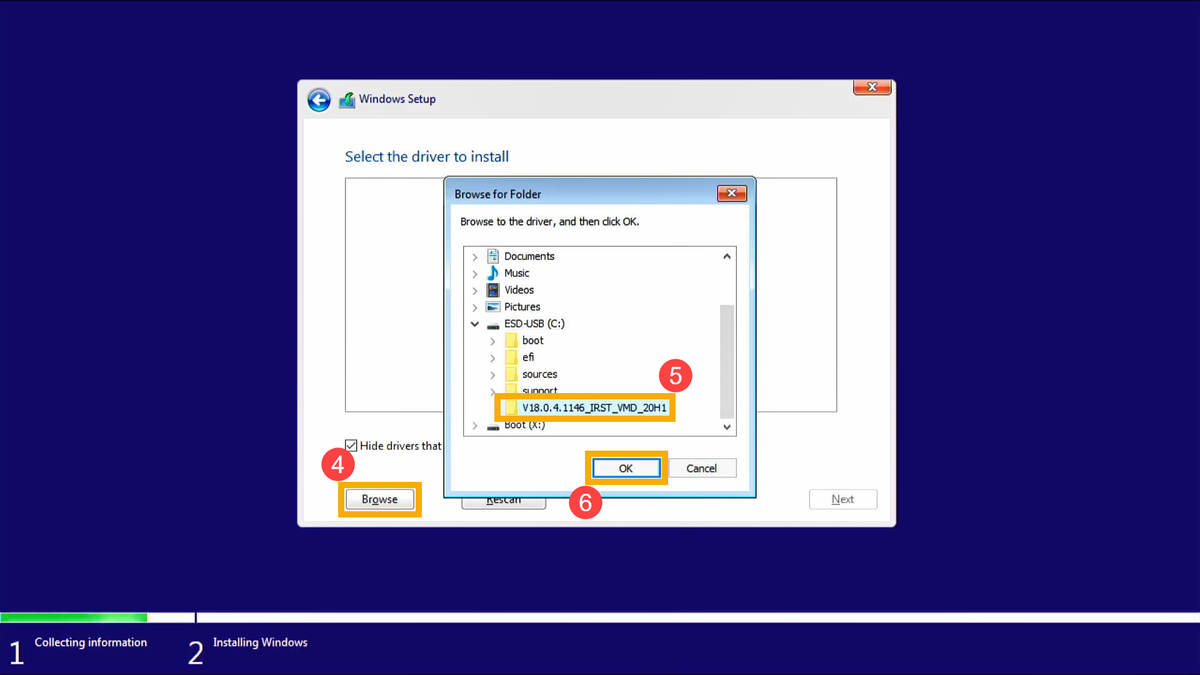
  • Select [Browse]④, then find the [V18.0.4.1146_IRST_VMD_20H1] folder⑤ and select [OK]⑥.

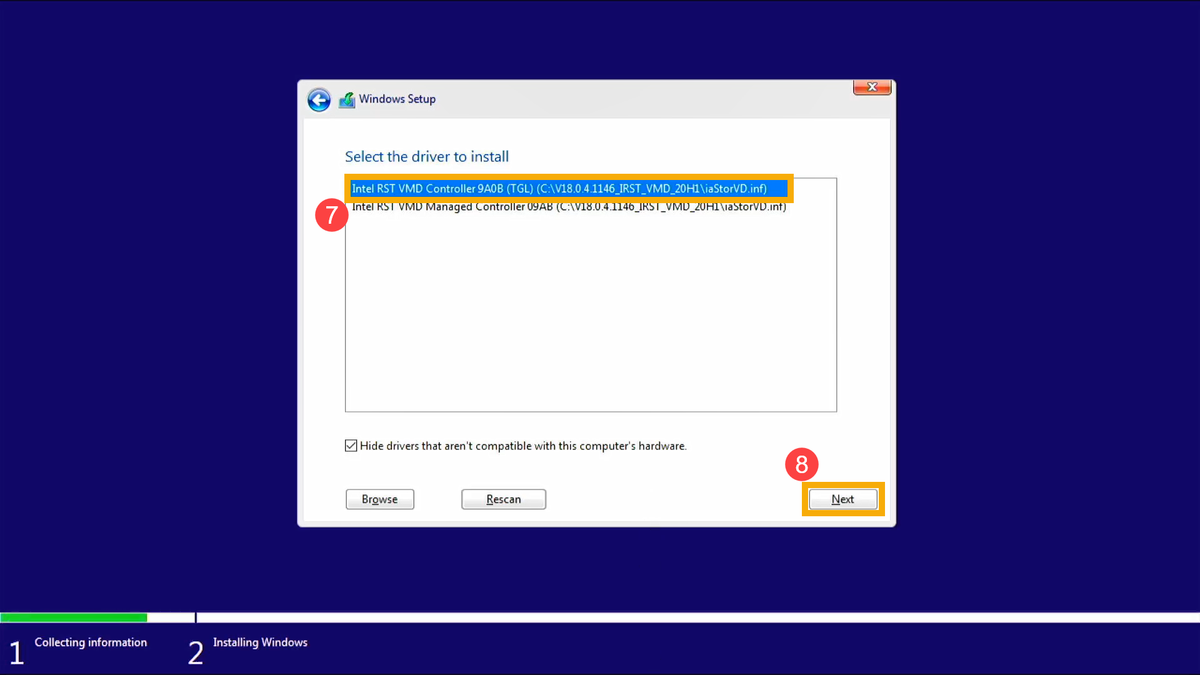
  • Select [Intel RST VMD Controller 9A08 (TGL) ]⑦, then select [Next]⑧ to install the driver.

  • After the driver installation is completed, the drives will appear normally.

That's it!

The Windows installer should now see your M.2/NVMe drive!


Original Article:
https://www.asus.com/support/faq/1044458

Monday, March 7, 2022

Ransomware Infection? This could help!!


Ransomware infections are a very real and very serious problem that general computer users, and businesses alike, should be prepared for!

  • First off, the best prevention to start with is to have good security software installed that can protect you from Ransomware infections (such as Malwarebytes Anti-malware, Kaspersky Antivirus, etc).
  • Secondly, have a good data backup system in place that follows the 3-2-1 backup rule to keep your data safe! 
    • The 3-2-1 backup rule simply states that you should have:
      • 3 copies of your data (your main data and 2 backup copies)
      • On two different media types (NAS drive and a thumb drive)
      • With one copy off-site for disaster recovery (cloud backup, etc).

If you do get hit with a ransomware infection, the website below can help you identify which ransomware you were infected with and if there is a de-encryption tool available to help get your data/files back: https://id-ransomware.malwarehunterteam.com/


Pacific NW Computers
www.pnwcomputers.com
360.624.7379